Staking on cryptocurrencies is betting/entering a number of coins or tokens into a pool or smart contract, in exchange for rewards or getting a whitelist ticket for IDO. Staking is now very familiar, usually used for defi projects to give rewards to the community, or used to get whitelist tickets or other tokens such as NFT (Non Fungiable Token)
Staking tokens run on the blockchain completely, for example if you staking crc20 tokens, then you interact directly with smart contracts staking on the coinex blockchain, without any intervention from other parties. In general, staking information & features can be seen on the blockchain directly, for example
- Will the token be locked or not?
- Is there a transaction fee or not?
- Are there any rewards in the form of IDO/NFT tokens/tickets?
- Or some other features
You can see the above directly in the staking smart contract, you can see and browse directly on the coinex smart chain explorer. Each staking smart contract has different features, it all depends on the smart contract maker or developer. For crypto-defi users, staking is an opportunity to passively generate profits, without trading coins or tokens. Staking can only be run on blockchains that use the Proof of Stake protocol, for example Coinex Smart Chain, on that blockchain you can staking native coinex (CET) or staking tokens crc20/crc721
To make Dapps staking you need to create a smart contract, you can use an open source smart contract from openzepplin. In this article we will provide a tutorial on how to staking crc20 tokens on the coinex smart chain blockchain. The staking that we make later does not have a reward feature, smart contract staking only has a stake, unstake, and several other features, smart contract staking is usually used for IDO Whitelists.
Example of use: when a project (A) wants to do IDO, and they collaborate with project B, then anyone who wants to buy IDO project A tokens, must first stake token B for a certain amount and time. Other people call this “Staking for IDO Whitelist” or Staking to get tickets to buy IDO Tokens
What is Needed?
1# EVM Wallet (Metamask)
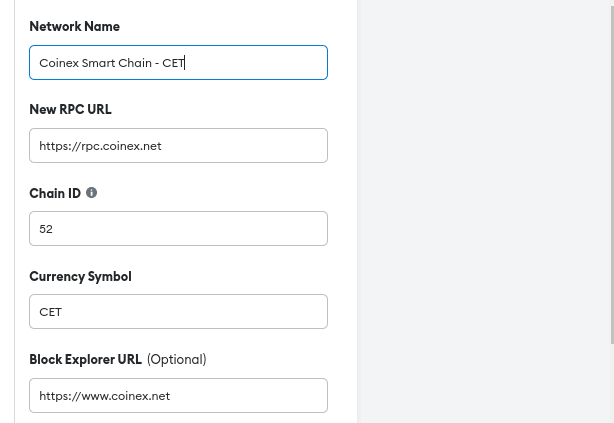
I recommend that you use a metamask browser, because it is easier to use for trading or to interact contracts with the coinex smart chain blockchain. Don’t forget to set the RPC blockchain coinx smart chain, as below
RPC URL : https://rpc.coinex.net
Network Name : Coinex Smart Chain
ChainID : 52
Symbol : CET
Block Explorer : https://www.coinex.net
2# Coin CET (Coine Native Blockchain Coinex Smart Chain)
CET is a native coin of the coinex smart chain blockchain, you can buy the coin on Coinex Exchange. Coin CET is used to pay for all transactions on the coinex blockchain, such as deploy, transfer, crc20 transfer and interact contracts such as staking, unstaking, etc. After you buy CET coins, send them to your EVM wallet
3# CRC20 Smart Contract
This is a smart contract to create crc20 coinex smart chain tokens, I use opensource code from openzepplin. You can use from other sources, or change / modify as you wish.
// SPDX-License-Identifier: MIT
pragma solidity ^0.8.4;

import "@openzeppelin/contracts/token/ERC20/ERC20.sol";
import "@openzeppelin/contracts/token/ERC20/extensions/ERC20Burnable.sol";

contract TokenStake1 is ERC20, ERC20Burnable {
constructor() ERC20("Token Stake 1", "TS1") {
_mint(msg.sender, 1000000 * 10 ** decimals());
}
}
4# Staking Smart Contract
This is a staking smart contract, using the code from openzepplin open source, you can custom the smart contract if you want changes to the smart contract, you can use the smart contract for free, share it with others and are free to change as you wish.
//SPDX-License-Identifier: MIT
pragma solidity ^0.8.0;
import "@openzeppelin/contracts/security/ReentrancyGuard.sol";
import "@openzeppelin/contracts/access/Ownable.sol";
import "@openzeppelin/contracts/interfaces/IERC20.sol";

contract StakeMyToken is ReentrancyGuard, Ownable {
address public TOKEN;
uint256 public UNSTAKEABLE_FEE = 9200; // How much can they Unstake? 92% AKA 8% Staking FEE
uint256 public MINIMUM_CONTRIBUTION_AMOUNT = 1 ether; // Minimum Token Amount to Stake
bool public CONTRACT_RENOUNCED = false; // for ownerOnly Functions

string private constant NEVER_CONTRIBUTED_ERROR = "This address has never contributed Tokens to the protocol";
string private constant NO_ETH_CONTRIBUTIONS_ERROR = "No Token Contributions";
string private constant MINIMUM_CONTRIBUTION_ERROR = "Contributions must be over the minimum contribution amount";

struct Staker {
address addr; // The Address of the Staker
uint256 lifetime_contribution; // The Total Lifetime Contribution of the Staker
uint256 contribution; // The Current Contribution of the Staker
uint256 yield; // The Current Yield / Reward amount of the Staker
uint256 last_yield_time; // The previous yield claim time.
uint256 unstakeable; // How much can the staker withdraw.
uint256 joined; // When did the Staker start staking
bool exists;
}

mapping(address => Staker) public stakers;
address[] public stakerList;
constructor() ReentrancyGuard() {

}

receive() external payable {}
fallback() external payable {}

function SweepToken() external onlyOwner {
uint256 a = IERC20(TOKEN).balanceOf(address(this));
// Do whatever with tokens sent to the contract (used to send initial bnb to get farms/yields going)
}

function UpdateToken(address _token) external onlyOwner {
TOKEN = _token;
}

function AddStakerYield(address addr, uint256 a) private {
stakers[addr].yield = stakers[addr].yield + a;
}

function RemoveStakerYield(address addr, uint256 a) private {
stakers[addr].yield = stakers[addr].yield - a;
}

function RenounceContract() external onlyOwner {
CONTRACT_RENOUNCED = true;
}

function ChangeMinimumStakingAmount(uint256 a) external onlyOwner {
MINIMUM_CONTRIBUTION_AMOUNT = a;
}

function ChangeUnstakeableFee(uint256 a) external onlyOwner {
UNSTAKEABLE_FEE = a;
}

function UnstakeAll() external onlyOwner {
if(CONTRACT_RENOUNCED == true){revert("Unable to perform this action");}
for (uint i = 0; i < stakerList.length; i++) {
address user = stakerList[i];
ForceRemoveStake(user);
}
}

function Stake(uint256 amount) external {
// Users must approve this contract to spend their tokens first.
require(amount >= MINIMUM_CONTRIBUTION_AMOUNT, MINIMUM_CONTRIBUTION_ERROR);
require(IERC20(TOKEN).transferFrom(msg.sender, address(this), amount), "Unable to transfer your tokens to this contract");
uint256 unstakeable = (amount * UNSTAKEABLE_FEE) / 10000;

if(StakerExists(msg.sender)){
stakers[msg.sender].lifetime_contribution = stakers[msg.sender].lifetime_contribution + amount;
stakers[msg.sender].contribution = stakers[msg.sender].contribution + unstakeable;
stakers[msg.sender].unstakeable = stakers[msg.sender].unstakeable + unstakeable;
}else{
// Create new user
Staker memory user;
user.addr = msg.sender;
user.contribution = unstakeable;
user.lifetime_contribution = amount;
user.yield = 0;
user.exists = true;
user.unstakeable = unstakeable;
user.joined = block.timestamp;
// Add user to Stakers
stakers[msg.sender] = user;
stakerList.push(msg.sender);
}

// Staking has completed (or failed and won't reach this point)
uint256 c = (10000 - UNSTAKEABLE_FEE);
uint256 fee = (amount * c) / 10000;
// Staking fee is stored as fee, use as you wish
}

function RemoveStake() external {
address user = msg.sender;
if(!StakerExists(user)){ revert(NEVER_CONTRIBUTED_ERROR); }
uint256 uns = stakers[user].unstakeable;
if(uns == 0){ revert("This user has nothing to withdraw from the protocol"); }
// Proceed to Unstake user funds from 3rd Party Yielding Farms etc

// Remove Stake
stakers[user].unstakeable = 0;
stakers[user].contribution = 0;
IERC20(TOKEN).transfer(user, uns);
}

function ForceRemoveStake(address user) private {
// withdraw avAVAX for WAVAX and Unwrap WAVAX for AVAX
if(!StakerExists(user)){ revert(NEVER_CONTRIBUTED_ERROR); }
uint256 uns = stakers[user].unstakeable;
if(uns == 0){ revert("This user has nothing to withdraw from the protocol"); }
// Proceed to Unstake user funds from 3rd Party Yielding Farms etc

// Remove Stake
stakers[user].unstakeable = 0;
stakers[user].contribution = 0;
IERC20(TOKEN).transfer(user, uns);
}
/*

CONTRIBUTER GETTERS

*/
function StakerExists(address a) public view returns(bool){
return stakers[a].exists;
}

function StakerCount() public view returns(uint256){
return stakerList.length;
}

function GetStakeJoinDate(address a) public view returns(uint256){
if(!StakerExists(a)){revert(NEVER_CONTRIBUTED_ERROR);}
return stakers[a].joined;
}

function GetStakerYield(address a) public view returns(uint256){
if(!StakerExists(a)){revert(NEVER_CONTRIBUTED_ERROR);}
return stakers[a].yield;
}

function GetStakingAmount(address a) public view returns (uint256){
if(!StakerExists(a)){revert(NEVER_CONTRIBUTED_ERROR);}
return stakers[a].contribution;
}

function GetStakerPercentageByAddress(address a) public view returns(uint256){
if(!StakerExists(a)){revert(NEVER_CONTRIBUTED_ERROR);}
uint256 c_total = 0;
for (uint i = 0; i < stakerList.length; i++) {
c_total = c_total + stakers[stakerList[i]].contribution;
}
if(c_total == 0){revert(NO_ETH_CONTRIBUTIONS_ERROR);}
return (stakers[a].contribution * 10000) / c_total;
}

function GetStakerUnstakeableAmount(address addr) public view returns(uint256) {
if(StakerExists(addr)){ return stakers[addr].unstakeable; }else{ return 0; }
}

function GetLifetimeContributionAmount(address a) public view returns (uint256){
if(!StakerExists(a)){revert("This address has never contributed DAI to the protocol");}
return stakers[a].lifetime_contribution;
}

function CheckContractRenounced() external view returns(bool){
return CONTRACT_RENOUNCED;
}

}
How to Create Staking Token CRC20 Coinex Smart Chain
1# Deploy Token CRC20
For the initial step, you have to deploy the crc20 token using the smart contract we provided above, Open the Coinex Remix IDE https://ide.coinex.net/
- Create a new file, example token.sol and enter the smart contract
- Compile the smart contract
- Deploy smart contract & wait until transaction is fully confirmed on blockchain (3-5 seconds complete)
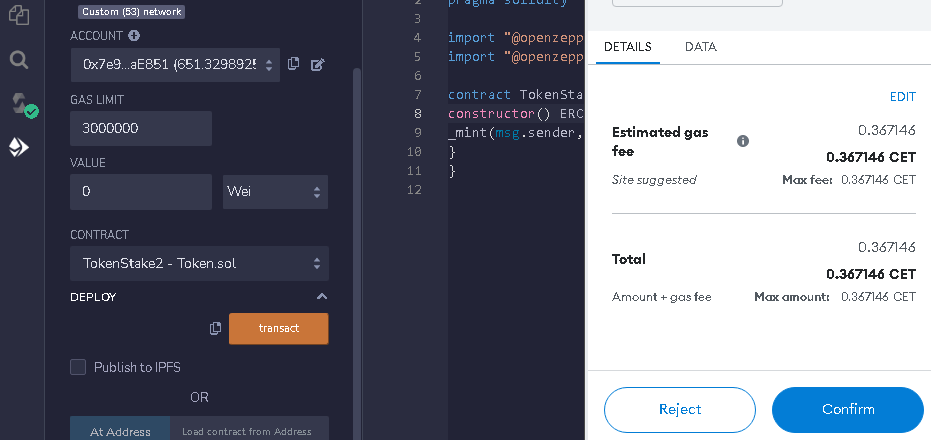
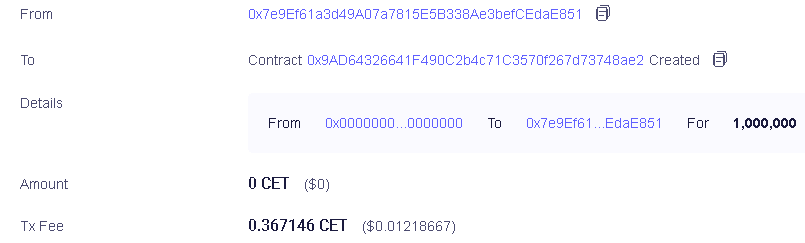
2# Deploy Staking Smart Contract
Same steps as above, use the coinex idea remix to deploy smart contract staking.
- Create a new file, for example stakingtoken.sol and enter the staking smart contract
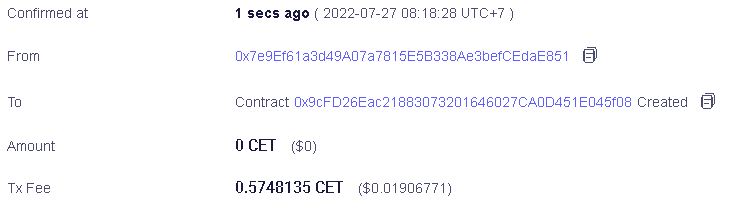
- Compile the smart contract, if there is a warning just skip it
- Deploy smart contract staking & wait until the transaction is fully confirmed on the blockchain (3-5 seconds complete)
3# Smart Contract CRC20 & Staking Verification
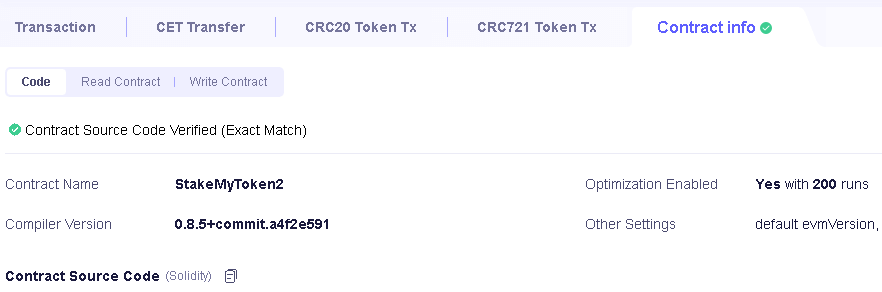
After the crc20 token creation process is complete and the smart contract staking process is complete, the next step is to verify the smart contract to the coinex smart chain explorer, this verification is very necessary for smart contract transparency and makes it easier for users to interact with the smart contract, because when the smart contract is verified , all the information in the smart contract is listed on the coinex smart chain explorer page, the user can assess whether there is a code error or fraud in the smart contract.
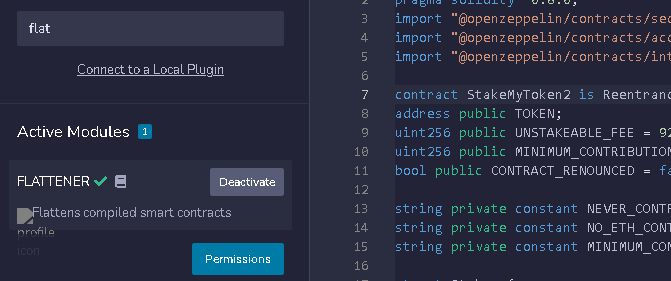
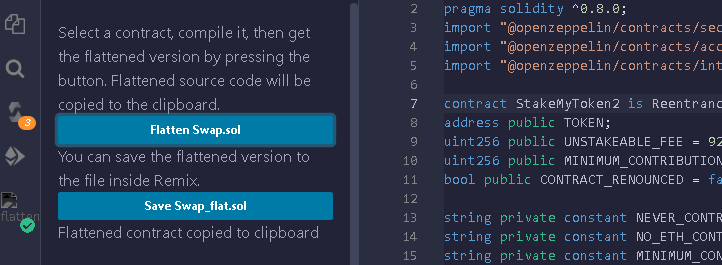
- Install the flattener plugin in the Coinex Remix IDE, activate it
- Flat 2 files of the smart contract (crc20 token and staking)
- Save 2 new files (result of the flattener)
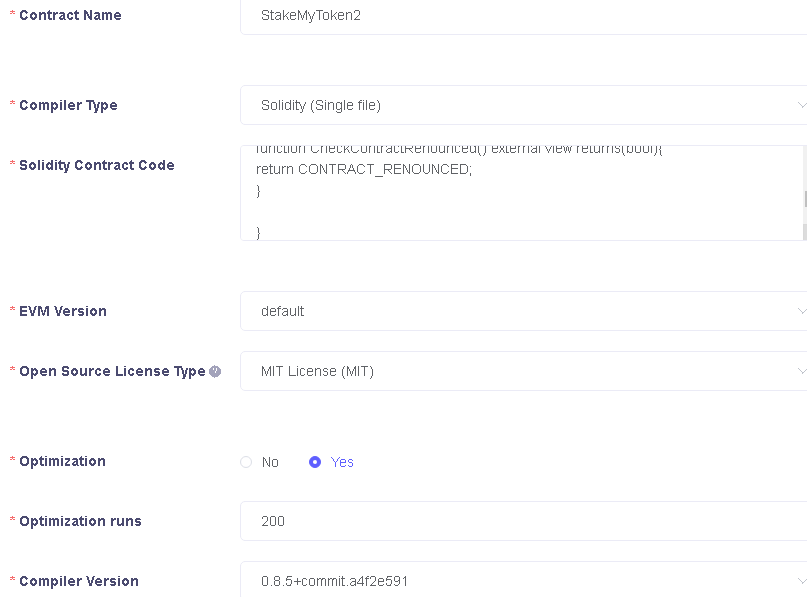
- Open the crc20 token smart contract and staking in explorer, verify by clicking the “contract info” menu, clicking “verify & publish”
- Enter all required information such as contract name, compiler type, compiler version, file type, etc
- If it is filled in correctly and completely, click verify / publish
Continue to Part 2