In general Staking is the process of validating a blockchain network and validators will get a reward in the form of native coins from the blockchain. Usually to do staking we need to lock a number of coins (eg CET) in a wallet and the wallet is on a server (validator), the validator has the ability to confirm transactions on the blockchain network and get a reward for each completed block.
Anyone can become a validator or staking on the coinex smart chain blockchain network, of course, they must prepare a server with high specifications and lock a number of CET coins in the validator’s wallet. For example on the ethereum 2.0 network, staking requires 32 ETH coins, if on the coinex smart chain network, it requires 10,000 CET coins. Each blockchain has different requirements depending on the consensus or conditions of the blockchain developer itself.
The purpose of staking is to secure the Coinex smart chain network from attacks and to make it more decentralized. But there is also staking that uses smart contracts, for example staking on some defi platforms. Users can lock certain tokens in the staking pool (smart contract) and they will get rewards in the form of tokens. Some use smart contract staking to get an IDO ticket or an IDO whitelist, for example on some of Solana’s launchpad platforms.
In this article I will give a tutorial on how to make dapps staking for the coin native coinex smart chain, namely CET. This staking does not have a reward or farming feature, it is more suitable for the “Staking for IDO whitelist” method or staking for IDO tickets which are usually done by some launchpad platforms. What I will teach is staking using smart contracts on the coinex smart chain blockchain. Why did I choose the coinex smart chain blockchain?
- Coinex smart chain is more environmentally friendly, because it uses the PoS (Proof of Stake) protocol
- Coinex smart chain has high performance, validating 1 transaction only takes 3-5 seconds, in contrast to other blockchains which require 30 seconds to 60 minutes
- High TPS, coinex smart chain can accommodate more than 600 transactions per second
- EVM support, this is what I like the most, we can apply the same code (smart contract) as ethereum on the coinex smart chain blockchain
What to Prepare ?
There are several things you need to prepare to make a Cet Staking on Coinex Smart Chain.
1# EVM Wallet (Metamask)
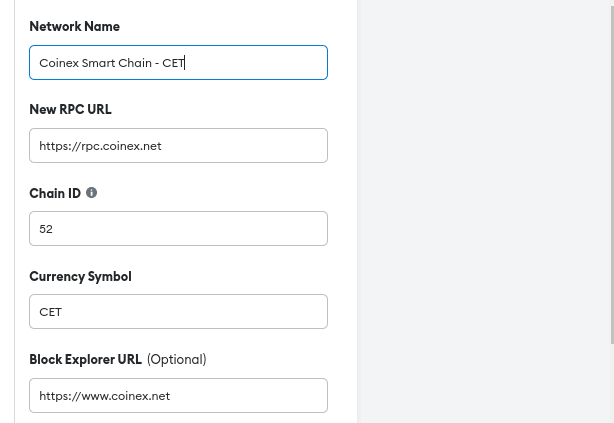
Wallet for the coinex smart chain blockchain, you can use Metamask, I recommend using the browser version of Metamask, because it is easier to use. You need to change or setting rpc metamask to rpc coinex, like this
RPC URL : https://rpc.coinex.net
Network Name : Coinex Smart Chain
ChainID : 52
Symbol : CET
Block Explorer : https://www.coinex.net
2# Coin CET (Coin Native Coinex Smart Chain)
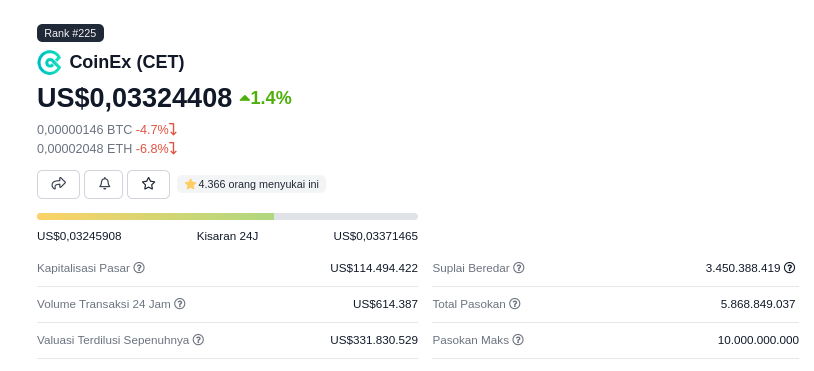
CET is the native coin of the coinex smart chain blockchain, which means that all transaction fees in the blockchain are paid using CET coins, for example if you send tokens, swap or trade, you need CET coins to pay gas fees. For 1 time transaction on Coinex is very cheap, no more than $0.005. To get CET coins you can buy them on the Coinex Exchange. Coin CET is currently worth $0.033 per coin, you can see the graph and history of coin cet on coinecko or coinmarketcap.
3# Staking CET Smart Contract
This is a CET Staking smart contract, with this smart contract we can create a staking platform for CET coins,
//SPDX-License-Identifier: MIT

pragma solidity ^0.8.0;

import "@openzeppelin/contracts/security/ReentrancyGuard.sol";
import "@openzeppelin/contracts/access/Ownable.sol";

contract CetStaking is ReentrancyGuard, Ownable {

uint256 public UNSTAKEABLE_FEE = 9990; // How much can they Unstake? 99.9% AKA 0.1% Staking FEE
uint256 public MINIMUM_CONTRIBUTION_AMOUNT = 0.05 ether; // Minimum Amount to Stake
bool public CONTRACT_RENOUNCED = false; // for ownerOnly Functions
string private constant NEVER_CONTRIBUTED_ERROR = "This address has never contributed CET to the protocol";
string private constant NO_ETH_CONTRIBUTIONS_ERROR = "No CET Contributions";
string private constant MINIMUM_CONTRIBUTION_ERROR = "Contributions must be over the minimum contribution amount";

struct Staker {
address addr; // The Address of the Staker
uint256 lifetime_contribution; // The Total Lifetime Contribution of the Staker
uint256 contribution; // The Current Contribution of the Staker
uint256 yield; // The Current Yield / Reward amount of the Staker
uint256 unstakeable; // How much can the staker withdraw.
uint256 joined; // When did the Staker start staking
bool exists;
}

mapping(address => Staker) public stakers;
address[] public stakerList;

constructor() ReentrancyGuard() {

}

receive() external payable {}
fallback() external payable {}
function SweepETH() external onlyOwner {
uint256 a = address(this).balance;
}

function AddStakerYield(address addr, uint256 a) private {
stakers[addr].yield = stakers[addr].yield + a;
}

function RemoveStakerYield(address addr, uint256 a) private {
stakers[addr].yield = stakers[addr].yield - a;
}

function RenounceContract() external onlyOwner {
CONTRACT_RENOUNCED = true;
}

function ChangeMinimumStakingAmount(uint256 a) external onlyOwner {
MINIMUM_CONTRIBUTION_AMOUNT = a;
}

function ChangeUnstakeableFee(uint256 a) external onlyOwner {
UNSTAKEABLE_FEE = a;
}

function UnstakeAll() external onlyOwner {
if(CONTRACT_RENOUNCED == true){revert("Unable to perform this action");}
for (uint i = 0; i < stakerList.length; i++) {
address user = stakerList[i];
ForceRemoveStake(user);
}
}

function Stake() external nonReentrant payable {
require(msg.value >= MINIMUM_CONTRIBUTION_AMOUNT, MINIMUM_CONTRIBUTION_ERROR);
uint256 bnb = msg.value;
uint256 unstakeable = (bnb * UNSTAKEABLE_FEE) / 10000;

if(StakerExists(msg.sender)){
stakers[msg.sender].lifetime_contribution = stakers[msg.sender].lifetime_contribution + bnb;
stakers[msg.sender].contribution = stakers[msg.sender].contribution + unstakeable;
stakers[msg.sender].unstakeable = stakers[msg.sender].unstakeable + unstakeable;
}else{
// Create new user
Staker memory user;
user.addr = msg.sender;
user.contribution = unstakeable;
user.lifetime_contribution = bnb;
user.yield = 0;
user.exists = true;
user.unstakeable = unstakeable;
user.joined = block.timestamp;
// Add user to Stakers
stakers[msg.sender] = user;
stakerList.push(msg.sender);
}

// Staking has completed (or failed and won't reach this point)
uint256 c = (10000 - UNSTAKEABLE_FEE);
uint256 fee = (bnb * c) / 10000;
}

function RemoveStake() external {
address user = msg.sender;
if(!StakerExists(user)){ revert(NEVER_CONTRIBUTED_ERROR); }
uint256 uns = stakers[user].unstakeable;
if(uns == 0){ revert("This user has nothing to withdraw from the protocol"); }
// Proceed to Unstake user funds from 3rd Party Yielding Farms etc

// Remove Stake
stakers[user].unstakeable = 0;
stakers[user].contribution = 0;
payable(user).transfer(uns);
}

function ForceRemoveStake(address user) private {
// withdraw avAVAX for WAVAX and Unwrap WAVAX for AVAX
if(!StakerExists(user)){ revert(NEVER_CONTRIBUTED_ERROR); }
uint256 uns = stakers[user].unstakeable;
if(uns == 0){ revert("This user has nothing to withdraw from the protocol"); }
// Proceed to Unstake user funds from 3rd Party Yielding Farms etc

// Remove Stake
stakers[user].unstakeable = 0;
stakers[user].contribution = 0;
payable(user).transfer(uns);
}

/*
CONTRIBUTER GETTERS
*/

function StakerExists(address a) public view returns(bool){
return stakers[a].exists;
}

function StakerCount() public view returns(uint256){
return stakerList.length;
}

function GetStakeJoinDate(address a) public view returns(uint256){
if(!StakerExists(a)){revert(NEVER_CONTRIBUTED_ERROR);}
return stakers[a].joined;
}

function GetStakerYield(address a) public view returns(uint256){
if(!StakerExists(a)){revert(NEVER_CONTRIBUTED_ERROR);}
return stakers[a].yield;
}

function GetStakingAmount(address a) public view returns (uint256){
if(!StakerExists(a)){revert(NEVER_CONTRIBUTED_ERROR);}
return stakers[a].contribution;
}

function GetStakerPercentageByAddress(address a) public view returns(uint256){
if(!StakerExists(a)){revert(NEVER_CONTRIBUTED_ERROR);}
uint256 c_total = 0;
for (uint i = 0; i < stakerList.length; i++) {
c_total = c_total + stakers[stakerList[i]].contribution;
}
if(c_total == 0){revert(NO_ETH_CONTRIBUTIONS_ERROR);}
return (stakers[a].contribution * 10000) / c_total;
}

function GetStakerUnstakeableAmount(address addr) public view returns(uint256) {
if(StakerExists(addr)){ return stakers[addr].unstakeable; }else{ return 0; }
}

function GetLifetimeContributionAmount(address a) public view returns (uint256){
if(!StakerExists(a)){revert("This address has never contributed DAI to the protocol");}
return stakers[a].lifetime_contribution;
}

function CheckContractRenounced() external view returns(bool){
return CONTRACT_RENOUNCED;
}

}
How tto Create CET Staking on Blockchain Coinex Smart Chain
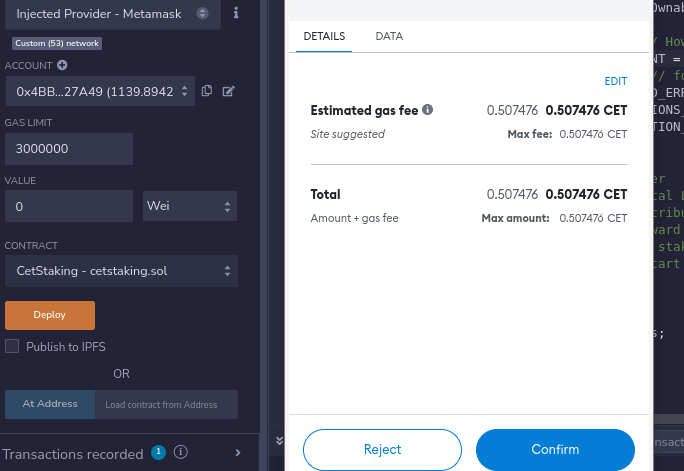
1# Deploy Smart Contract CET Staking
Go to the Coinex Remix IDE site https://ide.coinex.net/ . This site is like a remix of ethereum ide, used to deploy or interact with smart contracts. Some information in the smart contract that you can change or adjust.
- contract CetStaking = is the name of the smart contract, you can change it as you wish
- uint256 public UNSTAKEABLE_FEE = is the amount of fee when the user UnStake
- int256 public MINIMUM_CONTRIBUTION_AMOUNT = is the minimum number of CET coins that can be staked, for example a minimum of 1 CET for staking
How to Deploy Smart Contract
- Create a new file, example CetStaking.sol
- Paste the smart contract above, and compile the smart contract to completion
- After the compilation process is complete, click deploy the smart contract and confirm it in the Metamask wallet
2# CET Staking Smart Contract Verification
After the deployment process is complete, you need to verify the smart contract in the explorer coinex smart chain, so that the source code can be seen by the public, after the smart contract is verified, anyone can see the code and interact with the smart contract through the explorer coinex.
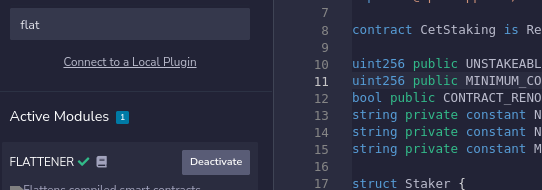
- Activate the coinex ide remix flattener plugin
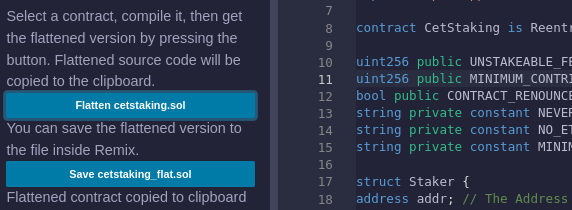
- Flat file smart contract staking, save the file and recompile
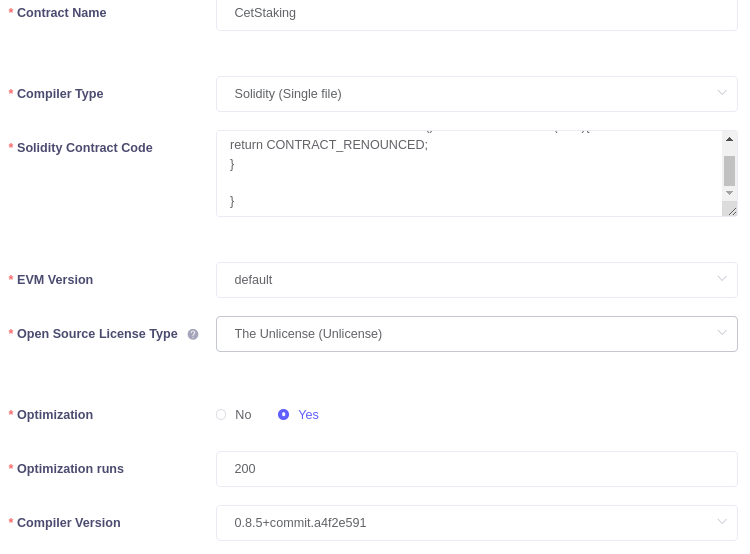
- Enter smart contract staking in the coinex smart chain explorer, click “Contract Info”
- Click “Verify & Publish” and fill in all the required information + input the smart contract code from the flat file